Working with Masks
With mask you can restrict the visible part or any layer (image, movie, or title) to a defined region. There are two types of masks: rectangular and oval. In addition a mask can have a soft edge to achieve certain special effects.
Adding a Masks
To add a mask to a layer, first select the layer. Then right click the layer (in the Stage or the Storyboard/Timeline) to reveal the context menu. Choose an appropriate command from the submenu. There are several different choices:
| None | Clears any mask that a layer might have had. |
| Oval | Assigns a rectangular mask. If this layer didn't have a mask before, then the size of the mask will be match the image size and the smaller zoom factor. |
| Rectangle | Assigns an oval mask. If this layer didn't have a mask before, then the size of the mask will be match the image size and the smaller zoom factor. |
| Left Half of Stage | Assigns a rectangular mask that fills the left half of the stage. This is a convenient shortcut to achieve split-screen effects. |
| Right Half of Stage | Assigns a rectangular mask that fills the right half of the stage. This is a convenient shortcut to achieve split-screen effects. |
| Top Half of Stage | Assigns a rectangular mask that fills the top half of the stage. This is a convenient shortcut to achieve split-screen effects. |
| Bottom Half of Stage | Assigns a rectangular mask that fills the bottom half of the stage. This is a convenient shortcut to achieve split-screen effects. |
| 1:1 Square | Assigns a non-animated square mask. |
| 4:3 Portrait | Assigns a non-animated 4:3 portrait orientation mask. |
| 16:9 Landscape | Assigns a non-animated 16:9 landscape orientation mask. |
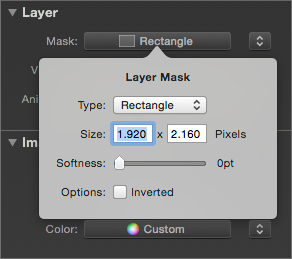
To fine-tune the mask, go to the Image, Movie, or Title options in the sidebar, and click on the Mask button. A popover which contains additional parameters appears.
Change the softness value, if you want a soft edge for your mask.
Modifying a Mask
When you select a layer that has a mask, a switch will appear in the Stage, next to the Zoom and Rotate jogwheels.
Initially this switch is in the “Edit layer” setting. Clicking and dragging a layer in the stage, or using the jogwheels to zoom or rotate, affect the image, movie, or title of this layer. If you want to modify the mask instead of the image, then turn the switch to “Edit mask”. The frame of the layer will change from white to blue, to indicate mask editing mode.
Now clicking and dragging moves the mask. As you drag, you will see that the parts outside the mask (which are normally completely invisible) are partially visibible to aid in positioning the mask. To zoom or rotate the mask use the jogwheels.
Animating a Mask
Just like an image, movie, or title layer can be animated, so can masks. Simply move position a mask in different location for the start and finish of an animation. Or choose different zoom or rotation for start and finish. A multitude of effects is possible with animated masks. Some examples follow below.
Examples
There are multiple creative ways of using masks. Here are a few examples:
Picture in Picture
Use a rectangular mask (non-animated), with an animated picture. The picture has a border, the mask has softness 0%.
Animated Mask
Add an image layer on the Stage. Use the same geometry for the start and finish of the animation (by using the commands from the menu). That way the image appears non-animated. Then assign a mask of your liking to this image. Switch to mask editing mode by double clicking the image on the left side of the Stage. Position, zoom, and rotate the starting mask as desired. Then double click the image on the right side of the Stage, to position, zoom, and rotate the finish mask as desired.
Splitscreen
Place two vertical images on the stage. Right click each layer and choose > from the context menu for the first layer, and > for the second layer. Position each image within its mask. If you want to use animation, choose different positions or zoom values for the start and the finish.
Animated Travel Routes
Animated masks can be used to achieve various interesting effects. A common one the is the travel route on a map (as seen in the Indiana Jones movies). Place an image of the map on the stage. In Photoshop create a second image file with the same size. This image should be completely transparent, and then draw the travel route as a red line. Save this image as a PNG file, so that transparency is preserved.
Now add this image as a second layer atop of the map layer. Select the map layer and choose > , then select the route layer and choose > , to make sure that both layers are perfectly aligned. If you want to animate the map (e.g. pan across), then you will have to repeat these steps for the start and finish of the animation.
Now comes the interesting part: Assign a rectangular map (possibly with a small amount of softness) to the route layer. Switch to mask editing mode, then move the mask out of the way for the start of the animation, so that all of the red line in the route layer is hidden. For the finish of the animation, position the mask so that the red line is completely visible.
The resulting effect is an animation that gradually reveals more of the red travel route line. Please note that this technique only works well for reasonably straight travel routes. A route that zig zags or goes in a circle will have to be broken up into several segments and are animated in consecutive slides.


