Controlling Audio Volume
FotoMagico offers various ways to control the volume of individual audio items. In addition, there is a master volume slider at the bottom right of the document window.
Audio Volume
The simplest method to control volume for a single audio item is to select it in the Storyboard or Timeline, and then use the volume slider in the Audio Options in the sidebar. Note that double clicking the audio item automatically switches the sidebar to the Options.
While you are in Timeline view the volume is displayed as a yellow line on a selected audio item. As you adjust the volume slider, this yellow line moves up or down. You can also click directly on this yellow line and drag it up or down to adjust the volume.
Ducking
Ducking is a technique that is used to temporarily lower the volume of other audio tracks by a specified amount. This is useful in situations like:
- Lower the volume of music, while a video with recorded audio is playing
- Lower the volume of music, while recorded narration is playing
- Lower the volume of music, while a sound effect is playing
In each of the mentioned cases, music volume is temporarily lowered so that voices, dialog, or other sound is not drowned out by the music. To use ducking, select an audio item that you want to be clearly audible, then enable ducking by clicking on the checkbox and specify the percentage by which all other audio tracks should be lowered. If you enter 40%, other tracks will play at 60% of their original volume.
Manual Audio Fades
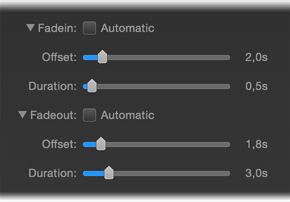
Audio fades occur at the start and at the end of an audio item. By default the fadein duration and fadeout duration are automatic and are the same as the durations of the visual transitions directly above them. In most cases this is appropriate. In some situation you may want to customize these audio fades. Please note that this is only possible in FotoMagico Pro The fadein and fadeout are visualized as a shaded yellow triangle on the audio item.
Click on the left edge of an audio item and start dragging, to change the fadein offset. This is useful, if you don't want the audio to start at the beginning of a slide, but somewhere in the middle of a slide. Click on the small square yellow dot at the fadein triangle and drag it left or right to change the duration of the fadein.
Click the right edge of an audio item and start dragging, to change the fadeout offset. Click in the small square yellow dot at the fadeout triangle and drag it left or right to change the duration of the fadeout. In some situations you may want an extra slow fadeout of the audio. To achieve this first drag the right edge to the right, and then the yellow dot to the left to make the fadeout triangle longer.
As you make changes, the sliders in the Audio Options update live to reflect the current values. You can also use these sliders or the text fields to their right to enter specific duration values.
Volume Envelopes
Volume envelopes is a advanced feature in FotoMagico Pro to change the volume of audio over time. This is an alternative to Ducking, which was described above. Ducking is easy to use, but in some cases it is not flexible enough. Volume envelopes allow for more precise manual control, but they do not offer the “automatic” lowering that Ducking does. Each technique has its advantages and disadvantages, so you need to decide which technique is more appropriate in each separate case.
Volume envelopes are created by adding (round) points to the yellow volume line and changing it from a straight line to a curve. Add points by:
- Press the ⌘ key and click on the yellow volume line.
- Right click on the yellow volume line and select from the context menu.
To delete an existing point:
- Press the ⌘ key and click on an envelope point.
- Right click on an envelope point and select from the context menu.
To move points simply click and drag them around. Dragging up increases the volume, dragging down decreases volume. You can also click on a line segment and drag it up or down. Use multiple points to create a smooth curve.


