Audio Options
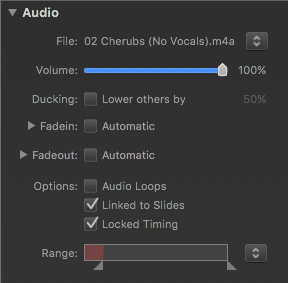
The Audio Options inspector lets you change parameters of selected audio in the Storyboard/Timeline. You can make changes to multiple audio items at once by selecting several items in the Storyboard/Timeline before adjusting settings in the Audio Options inspector.
File
When a single audio item is selected, the filename of the audio file will be displayed here. If you want to replace the audio file, while keeping all other parameters (volume, fades, audio markers, etc), select the command from the popup menu next to the filename. You can also select to show info about the audio file.
Volume
Controls how loud the audio is playing. Adjusting the volume is useful when different songs have been recorded at different levels and do not playback with similar loudness. Click and drag the Volume slider or enter a numerical value in the text field next to the slider.
You can also interactively adjust the volume directly in the Timeline. Click and drag the horizontal part of the yellow volume envelope line and drag up and down to increase or decrease the volume.
Ducking
When Ducking is enabled, the volume of other audio tracks is lowered by the specified percentage while this audio item is playing. This may be useful to lower the volume of music, while a sound effect or narration is playing. The default ducking factor is 50%, but you can enter a different percentage.
Fade-in and Fade-out
Normally audio is automatically faded in at the beginning and faded out at the end. The duration of these automatic fades is dependent on the visual transition between those slides. Please refer to the table in the Transition Options section to find out how the choice of transitions affect the automatic audio fades.
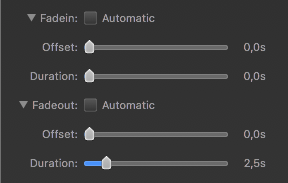
Audio fades can also be customized, if you turn off the Automatic checkbox. In this case the Offset and Duration sliders will be enabled. Offset determines the start of a fade-in or fade-out (from the beginning of a slide), while Duration determines the length of the fade itself.
You can also set custom fade-ins or fade-outs by clicking and dragging in the Timeline.
- Drag the left edge of an audio item to adjust the fade-in offset.
- Drag the small square yellow dot at the end of the fade-in triangle to adjust the fade-in duration.
- Drag the small square yellow dot at the end of the fade-out triangle to adjust the fade-out duration.
- Drag the right edge of an audio item to adjust the fade-out offset.
Audio Loops
If the audio is not long enough for the slides it spans, then checking Audio Loops makes sure that the audio is repeated while those slides are visible.
Linked to Slides
Audio can behave in two different ways when slides are being rearranged. The audio can either stay where it is, or it can move along with the slides that are being rearranged. This behavior can be decided for each audio item separately and can be controlled by selecting the Linked to Slides checkbox or by using the command in the context menu of the audio item.
The Authoring pane in the Preferences window has a section that lets you select whether newly added audio should be linked, unlinked, or whether FotoMagico should choose intelligently (depending on the situation). In this third case, audio will be linked if dropped below existing slides in the Music or Narration tracks, or unlinked if dropped into an empty section of the Storyboard.
Locked Timing
When Locked Timing is enabled audio is paused when the slideshow is paused. Audio also jumps to the appropriate position if the slideshow jumps back to the previous slide or skips ahead to the next slide. In other words, with locked timing, audio always stays in sync with the visuals.
Range
Set in and out points to restrict the portion of the audio to be played. This is done by dragging the triangles inward. Only the portion between the triangles will be played. The red section will not be playerd. The audio file itself will not be modified, so all changes can be undone at any time. The audio waveform in the Timeline adjusts automatically as you make changes.
For more precise control over in and out points, you can enter an exact in point or out point. From the popup menu, select or or double-click on the in point or out point triangles to open a popover to enter an exact timecode or use the jog wheel.
In the Timeline, you can also press the ⌥ key while clicking and dragging in the waveform to adjust the in point. This is helpful when there is silence at the beginning of an audio file and you want to skip over the silence.


