Text Editing
To add a new title, first make sure that a single slide is selected. Then click on the “Add Title” button in the toolbar. A new title appears, already in editing mode. Editing mode is visualised with a yellow frame. Since the whole text of the title is selected, you can start typing. Once you are done, press Enter or click anywhere on the Stage outside the yellow frame. The frame turns white again, indicating that you are no longer in editing mode.
If you want to change the text of an existing title, the double click it in the Stage. The title enters editing mode again as its frame turns yellow. Change the text as desired, then press Enter or click outside the yellow frame to stop editing.
Text Formatting
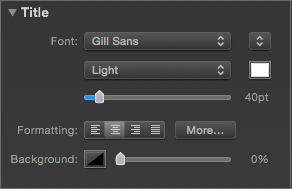
Titles can be formatted with the command in the menu and the OS X Font panel. However, it is much more convenient to use the formatting controls in the Title Options.
Use the Font family, face, and color popups to quickly change the style of the title. The size slider can be used to change the font size.
Use the Alignment buttons to choose left, right, center, or block alignment. Please note that for alignment to be really useful, you often have to make sure, that you title has the proper width. To change the width of a title, double click it to enter editing mode. Then click one of the two control points on the yellow frame and drag it left or right, until you reach the desired width.
If you use the formatting controls while a title is in editing mode, then the controls apply to the currenlty selected text. That way you can apply different fonts, color, or size to parts of the title. If you are not in editing mode, then any formatting changes always apply to the whole title.
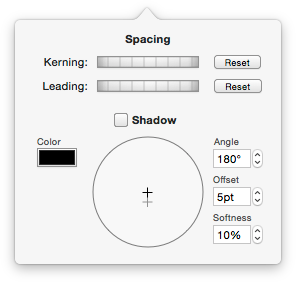
Click on the “More…” button to reveal additional formatting controls that are need less frequently: Kerning (character spacing) and Leading (line spacing), as well as text shadows.
Use the jogwheels to change kerning or leading. You can go back to the default values anytime by clicking on the Reset buttons.
Text shadows are most useful when you have a title layer above an image layer, and want to make sure that the title text is clearly legible, regardless of the image content behind the text. You can select the shadow color (black is most common), the shadow softness (blur), and its offset. Click on the Shadow checkbox to enable or disable the shadow.
Lower Thirds
By default the background color of a title is completely transparent (0% opacity). Using a background color with partial opacity (e.g. 50% black) can be used to create interesting effects, like a lower third. Make sure that you have enough space around the text (by adding empty lines at the top and bottom, change the width of the title to match the width of the Stage, and then place the title at the bottom of the Stage. To facilitate creating a lower third, we added a title snippet that can be found in the snipppets browser.
Text Placeholders
Text placeholders are variables that you can insert into the text of titles. These variables will be replaced with various bits of information, depending on the type of placeholder. To insert a placeholder, select an item from the
Slideshow Information
The information displayed by the following placeholders comes from the Slideshow Settings. If some fields in the Settings are empty, then the corresponding placeholder will not display anything.
| <SLIDESHOW-TITLE> | Displays the title of the slideshow |
| <SLIDESHOW-SUBTITLE> | Displays the subtitle of the slideshow |
| <SLIDESHOW-DESCRIPTION> | Displays the description of the slideshow |
| <AUTHOR> | Displays the name of the author |
| <ORGANIZATION> | Displays the name of the organization or company |
| <COPYRIGHT> | Displays the copyright |
| <EMAIL> | Displays the author's email address |
| <URL> | Displays the author's webpage |
The following placeholders relate to the slides or chapters of a slideshow. The information is not taken from the Settings.
| <SLIDE-NUMBER> | Displays the number of the current slide |
| <SLIDE-COUNT> | Displays the total count of slides in this slideshow |
| <SLIDE-NOTES> | Displays the notes of the current slide |
| <CHAPTER> | Displays the chapter name of the current slide (if it has a chapter) |
Image Metadata
The following placeholders display metadata information about the image layeer below the title layer containing the placeholder.
| <IMAGE-FILENAME> | Display the filename of the image |
| <IMAGE-TITLE> | Display the title of the image (as stored in IPTC tags) |
| <IMAGE-CAPTION> | Display the caption of the image (as stored in IPTC tags) |
| <CAPTURE-DATE> | Display the image's capture date |
| <CAPTURE-TIME> | Display the image's capture time |
| <EXPOSURE-TIME> | Display the image's exposure date |
| <APERTURE> | Display the image's aperture |
| <FOCAL-LENGTH> | Display the focal length |
| <ISO-SPEED> | Display the ISO speed value |
Audio Metadata
The following placeholders display metadata information about all audio in the music track of the slideshow. These placeholders are useful for music credits. Please note that these placeholder only yield useful information, if the necessary information is stored in the ID3 tags of the audio files. You can use iTunes to check if the tags are present, and add any information that may be missing.
| <AUDIO-SONGS> | Display the name of all songs used in this slideshow |
| <AUDIO-ALBUMS> | Display the name of all albums used in this slideshow |
| <AUDIO-ARTISTS> | Display the name of all musical artists used in this slideshow |
| <AUDIO-CREDITS> | Display full credits (Artist, song name, and URL) of all music used in this slideshow |

