Movie Options
The Movie Options inspector lets you change settings of selected movies in the Storyboard/Timeline. You can make changes to multiple movies at once by selecting several movies in the Storyboard/Timeline before adjusting settings in the Movie Options inspector.
File
When a single movie is selected, the filename of the movie will be displayed here. If you want to replace the movie, while keeping all other parameters (animation, color, etc.), select the command from the popup menu next to the filename. You can also select to show info about the movie file.
Volume
Controls how loud the audio of the movie is playing. Set it to 0% if you want the movie to be completely silent, because you have a song in the audio track instead. Drag the volume slider or enter a numerical value in the text field next to the slider.
Ducking
When Ducking is enabled, then the volume of other audio tracks is lowered by the specified percentage while the movie is playing. This is useful to lower the volume of a song in the music track, so that live sound of the movie can be heard more clearly.
Border
Use this feature to add a border to the selected movie layers. Use the slider or enter a point size to set the width of the border. Click on the color swatch to the left of the slider to choose the border color.
Color
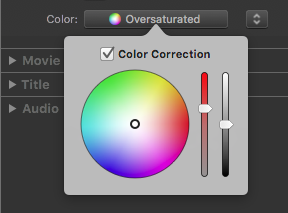
Use this feature to apply non-destructive color correction to the selected movie. Color correction can be used to modify the color tint, saturation, and gamma (lightness) of a movie. Click the Custom color button to open a popover. In the color wheel, click and drag the black circle to the preferred color tint, and use the saturation and lightness (gamma) sliders to adjust these parameters.
The movie in the Stage adjusts automatically as you make changes. Check or uncheck the “Color Correction” checkbox to enable or disable the color correction. That way you can make a before/after comparison. In the popup menu next to the button you can select and to copy the color correction from one movie to another, or to remove color correction from a movie.
Range
Set in and out points to restrict the portion of the movie to be played. This is done by dragging the range triangles inward. The red portions (outside of the triangles) will not be played. The movie file itself will not be modified, so all changes can be undone at any time. The movie in the Stage adjusts automatically as you make changes, displaying the in point on the left side and the out point on the right side.

